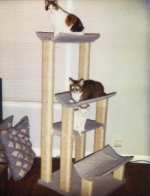
DO-IT-YOURSELF CAT TREE FURNITURE BUILDING PLAN BLUEPRINT
Build a four-perch cat tree measuring
2' wide, 2' deep, and 4'-6"
high.
Adapted from June/July 1994 issue of PETA's ANIMAL TIMES.
PETA materials are not copyrighted and may
be distributed freely.
These instructions appear on the Cats Haven site
and include
modifications and improvements.
Please visit their page and share your
comments with them.
- After actually building a few, we discovered
that some modifications were necessary for structural stability and
usability. We added 1x2 supports to the tops of the posts, a support
shelf to the middle of the tree, used 2x4's instead of 4x4's, and used
two bolts per post instead of one. Then we recessed the bolts so we
wouldn't gouge floors. We also decided not to use carpet, because our
cats scratch the carpet to pieces and then eat the pieces. This leaves a
ragged, bare patch that is difficult to replace. Therefore, we used a
heavy upholstery material and polybatting for the perches, shelf and
base.
(Comments from the posting on the Cat's Haven site.)
MATERIALS:
- Perches
- -- one (1) 22" length of 12" (diameter) Sono tube
- (check the CONCRETE FORMWORK SECTION in a
hardware or building supply store)
- cut lengthwise into three (3) curved sections.
- Posts
- -- two (2) 8'x2"x4" pieces of lumber,
- each piece cut into (1) 4'-6", (1) 2'-9", and (1) 9"
lengths.
-
- Supports
- -- one (1) 1"x2" piece of lumber cut into:
- three (3) 19" lengths (to span the posts at the
top beneath the perches);
- -- and --
- two (2) 13" lengths (to attach the support
perch).
- -- You'll have a 1" piece leftover for a toy! --
-
- Support Shelf Perch
- -- One (1) 19"x13" piece of plywood (to span
between posts and act as a stabilizer).
- Base
- -- two (2) 2'x2' pieces of 3/4" plywood.
- Hardware:
- twelve (12) 1/4" x 3-1/2" lag bolts;
- twelve (12) flat washers (to fit the bolts);
- twenty (20) 1-1/2" wood screws.
- heavy wire brad staples;
- staples (for staple gun);
-
- Fabric and batting
- -- four (4) 26" squares;
- -- one (1) 34" square in the cat's choice of color.
-
- Miscellaneous:
- 500' of 3/8" sisal rope;
- 3" long nails.
- wood glue;
- Tools
- saw (or have the lumber cut-to-length when purchased),
- drill (also a 1" bit for countersinking),
- screw driver,
- hammer,
- staple gun,
- wood clamps,
- measuring tape,
- carpenter's level,
- pencil.
- Alternative:
Eliminate need for lumber and sisal rope by using
clean, solid, bark-covered tree limbs or trunks approx. 4" diameter, cut
to specified lengths. (NOTE: Be certain that the wood is not inhabited
before you bring it inside!!!)
Please read the instructions thoroughly BEFORE starting the
project.
Not responsible for misprints, misunderstandings, or resulting
mistakes!
DIRECTIONS:
Prepare and Assemble the Posts:
- Cut the 2x4's into 4'-6", 2'-9", and 9" pieces (2 of each size).
"Measure twice and cut
once!"
- Drill two holes in the bottoms of each length of wood, using a
template (see base instructions).
- Attach the 19" long 1x2" support between the top ends of each pair
of posts, spanning the posts like a beam. Attach the 9" pieces
together, and the 2'-9" pieces, and then the 4'-6" pieces. Use nails
to fasten these pieces. Put them between the posts, not on top of
them.
Assemble the Base:
- Glue the 2'x2' pieces of 3/4" plywood together to form one
2'x2'x1-1/2" base.

- After the glue dries, drill six holes along two opposing sides of
the base about 2" from the edge.
An easy way to do this is to make a template on
cardboard or heavy paper then trace it onto the underside of the
plywood base. The template should be a rectangle 1-1/2" x 3-1/2" (the
actual size of a finished 2x4). Place the template in the corner of
the base 1" from the each edge (you can use the leftover 1" block as a
guide), trace the edges, and repeat for each corner. Measure 10-1/4"
from either end to position the edge of the template for the middle
rectangle on each side. You will have three rectangles in a row along
either side of the base, 1" from the base edge, as shown in the
drawing. Place two marks inside each rectangle for the bolt holes (the
center of the hole will be the diameter of a nickle from the end and
the sides of the rectangle).
- Countersink the holes with a 1" drill bit. This will allow the
bolt heads and washers to be recessed into the wood (so you won't
scratch your floors).
- Cover the top surface of the base with the 34" square of fabric,
by centering the base on the overturned square of carpet, wrapping the
edges of the carpet around the sides of the base, and securing the
fabric with staples tacked through the under side only.
Assemble the posts and base:
-
- Attach posts to base with the 3-1/2" lag bolts:
- Insert a bolt through a washer first, and attach the 9" post
assembly in the front.
- Next, attach the 2'-9" post asssembly in the middle.
- Then, place the 4'-6" post assembly in the rear.
- This forms a ramp the cats can run up.
- (Do not completely tighten the bolts yet. Bring them close to tight,
then back them off a bit.)
Attach the Support shelf Perch:
- Stand the tree upright.
- Clamp a 13" 1x2 between the 2'-9" and the 4'-6" posts, one on each
side, on the inside of the posts. Be sure the base bolts are loose, so
the posts are free to align themselves properly.
- Place the top of the 1x2 supports 21" above the base, and level
them.
- With these shelf supports clamped in place, place the 13"x19"
shelf perch on them. It should lay flat, and not wobble.
- Adjust the clamps and support 1x2's until the shelf lays flat.
- Once the shelf is laying flat, remove it and attach the 1x2's to
the posts more permanently. While still clamped in place, screw them
to the posts with the 1-1/2" wood screws (two per post). Then remove
the clamps. (A screwdriver clutch drill attachment makes
this easy work.)
- Screw the 13"x19" shelf to the 1x2 supports. Use three screws per
side.
- Now tighten the base lag bolts.
Attach the Perches:
- Cut the 12" diameter Sono Tube into thirds,
lengthwise, to form three curved sections each 22" in
length.
- Place one section on top of a post assembly. Screw it in place
using the wood screws. Put two screws in each 2x4 post. Repeat for
each perch.
- Cover each curved section of tube with poly batting and a 24"
square of fabric, placing seams on the the under sides of the perches,
attaching the fabric with staples. Also cover the Shelf Perch with
batting and fabric, stapling to the underside of the shelf.
Wrap the Posts with Sisal Rope
- Start at the base of the post, and use heavy wire brads and a
hammer. Fasten the rope to the bottom of the post, and begin wrapping.
Every 6 or 8 winds, tamp the rope down with a hammer. Fasten the rope
in the back of the 2x4's only, so the fasteners don't show.
- At the shelf perch, we cut small sections of rope and attached
them individually around the 1x2 shelf supports. Then we continued
winding after we passed the shelf. Each 50' length of 3/8" sisal rope
will wrap about 20" of 2x4.
- We constructed three such cat trees. One
person spent a couple of hours per night, for about five nights.
Wrapping the posts was the most time consuming task. Our cats just love
them!
(Comments from the posting on the Cat's Haven site.)
|


